Check the release notes to discover the latest updates and improvements in this version.
Breaking changes
If there are any breaking changes included in this release, carefully review them before upgrading to understand how they may impact your installation and to prepare for any necessary adjustments before or after the upgrade.
Breaking changes
Here we address changes that may cause previously working configurations to stop working after the update, if they are not adjusted to handle the changes below.
Only updated values are sent to pipe
Data changed by user will be sent to pipe.
Updated default encryption
As of 3.1.1 default encryption has been changed. This will only affect systems where encryption is enabled.
To keep previous implementation ensure environment setting:
FORTIFIED_SECRETS_IMPL = local
Overview
Overview of Fortified ID Forms
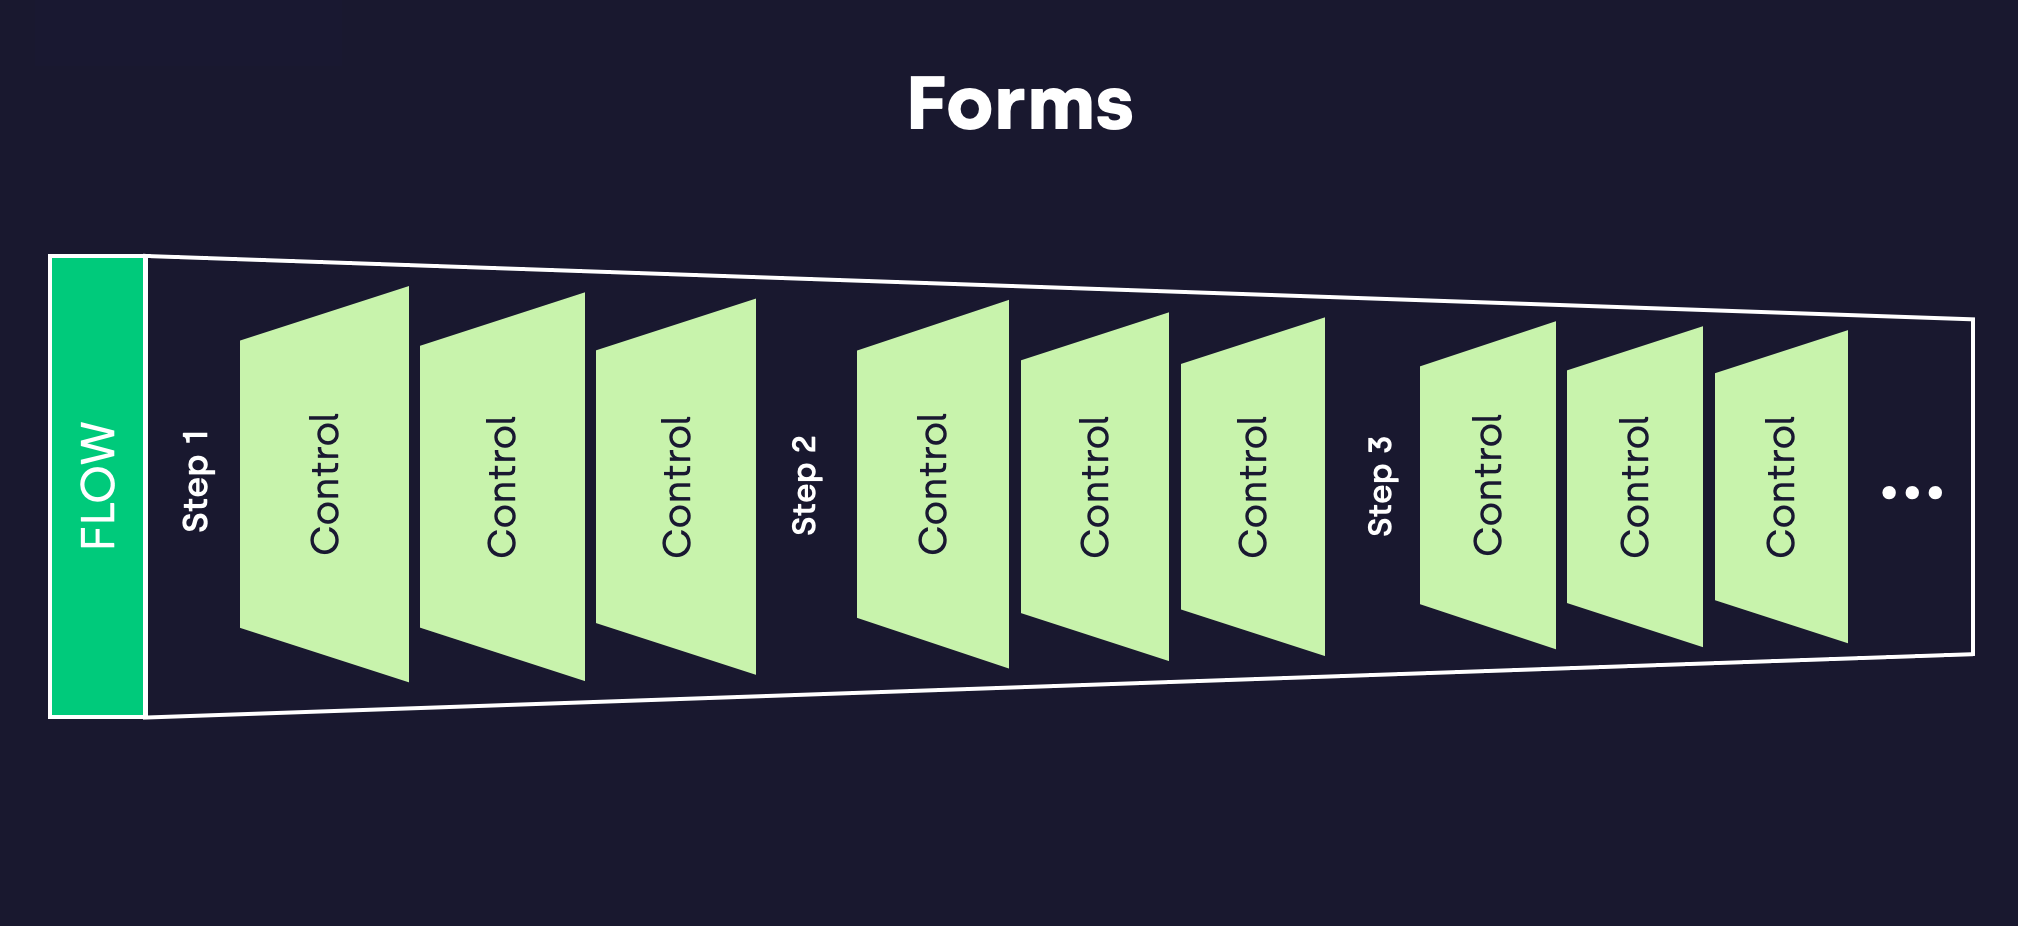
Forms is an application for digitizing administrative process flows. Typical use cases include creating users (e.g. employees, consultants, partners), editing user data, or listing “My Users” and “My Groups.”
Forms provides a powerful tool to build web-based flows that delegate administration to the individuals responsible for specific information—streamlining management and improving data accuracy.
You can also create self-service flows, including user self-registration. For example, a user can authenticate using BankID, where verified information is retrieved and used to allow the user to create their own account.
We offer several tutorial videos demonstrating how to work with Forms in various scenarios.
Note: All videos are in Swedish.
Related products to Forms
Other products from Fortified ID related to Forms
Automate enables integration with one or more systems to read, transform, and write data across connected platforms.
A common use case is reading data from an HR system to identify newly created users, then automatically provisioning these users in systems like Active Directory, Google Workspace, or Microsoft Entra ID—completely without manual intervention by administrators or end users.
Attest extends Forms and Automation with support for approval workflows. Instead of allowing users to be created or modified immediately, one or more designated approvers must first review and approve the request.
A typical use case is requesting access to a group that protects a resource—such as a system or service—where a group owner or administrator must approve access before it is granted.
The solution can be deployed on-premises, in the cloud, or as a hybrid. Moving between test and production environments is streamlined and straightforward.
Password Reset from Fortified ID simplifies the management of secure password reset for your organization.
Users can easily and securely create a new password through self-service without having to contact their employer's IT support.
Users with personnel responsibility (manager, teacher, partner/consultant manager) can reset passwords on behalf of another user.
Your organization becomes more efficient as the time that the end user does not have access can be greatly shortened. In addition, IT personnel can also devote themselves to more constructive and proactive work.
Forms is a comprehensive Identity and Access Management (IAM) solution designed to streamline and adapt to the specific workflows of your organisation.
The modern landscape of IAM requires a balance between automation and control, and Forms offers both in a way that aligns with your internal processes. IAM solutions today need to be flexible enough to manage the complexity of access control across an organisation, especially as digital environments become more intricate and regulated. Forms IAM addresses this by providing customisable workflows that can be fully automated or augmented with manual checkpoints, ensuring both efficiency and accuracy. This flexibility is crucial in industries with stringent compliance requirements, where every access decision needs to be carefully monitored and validated. Forms IAM is available both on-premises and in the cloud, giving you the flexibility to deploy the solution in the environment that best suits your infrastructure and security requirements. Whether you are looking to maintain full control over your data in an on-prem deployment or leverage the scalability and convenience of the cloud, Forms IAM adapts to your strategy.
Additionally, Forms IAM integrates seamlessly with a wide range of common identity providers and data sources, including Entra ID (formerly Azure Active Directory), Google Cloud Identity, Microsoft Azure, Active Directory, and other leading platforms. This ensures that you can easily manage and centralise access controls across your existing ecosystems, without the need for complex custom integrations. The system allows administrators to configure workflows to match existing processes within the company. Whether it’s handling new employee onboarding, access revocation, or ongoing entitlement reviews, each flow can be automated for speed or include manual approval steps for sensitive actions. This adaptability ensures that the solution integrates seamlessly with your organisation’s existing protocols, rather than forcing a rigid, predefined process onto your teams. With scalable operations, capable of managing identity and access across both small businesses and large enterprises, Forms IAM can evolve alongside your organisation as it grows or its requirements change. In today’s rapidly evolving security environment, having a robust yet flexible IAM system like Forms ensures that your organisation can handle access control efficiently while maintaining the level of precision and oversight necessary for security and compliance.
Basic controls
Basic controls are comparable to simple HTML inputs, such as checkboxes.
Authentication & authorisation
By default accessing a Flow requires authentication. Any authentication is expected to be handled by a trusted SAML IDP. Once authenticated, authorisation is based on the incoming SAML assertion.
How it is connected
In order for authentication to work, a SAML SP authenticator needs to be configured. Also, SAML SP need to share first part of URI in with Forms module.
Example
Forms module has "http_context" configured to "/forms". The SAML must have it's "http_context" set to "/forms/xxx" ("/forms/auth" is a good pattern).
Typically the properties regarding authentication in Forms module will look something like this:
Once the user is authenticated data from incoming assertion vill be transfered to the session.
NameID vill be the users login identifier. Other attributes will be put in the session where multivalued attributes is merged into a comma separated list.
Once authenticated all users by default can access a Flow. Restricting is based on roles attribute in the incoming assertion. By using the "requires_role" configuration parameter on the Flow restriction control is performed comparing the incoming "roles" in the assertion and data in "requires_role" for the Flow.
One value of "role" must match "requires_role" in order for user getting access.
Layout
Forms comes with ha default layout. It places controls from left to right.
All steps and summary pages use a layout grid with a base column width of 12.
All controls, or children, can be specified to have different sizes and multiple breakpoints for different screen sizes.
All controls (or children of the grid) have a base width of 12, meaning that they fill the entire width of the grid. A child with the width of 6 will occupies half of the grid, a child with the width of 8 will occupy 2/3s of the grid.
The grid will fill its columns from left to right and fit up to 12 columns in each "row".
Sizes for the controls can be set in the ui [SKRIV HÄR, måste kanske ändra en grej i hur man konfar kommer jag på nu.]
All controls will be rendered into the layout according to the order that they are defined.
Each breakpoint (a key) matches with a fixed screen width (a value):
xs, extra-small: 0px
sm, small: 600px
md, medium: 900px
For more advanced layout options you can also configure a "ui:grid" property on the ui for the step.
Using the "ui:grid" all other rendering will be bypassed, and only items found in the "ui:grid" will be rendered.
With "ui:grid" it is also possible to nest grids.
Summary step
Meant to provide user information after all logic has been successfully executed. Summary is optional but a good practice for improved user experience.
The summary step has some additional properties.
Name
Description
Mandatory
Default
auto_redirect
Automatic redirect to a portal url and reset flow data
Release notes
This will highlight the most important items. For in depth detail contact Fortified ID.
Improved error handling when selecting users.
Consistent sorting added.
Updated alignment for improved ux
Now can be configured reading list of members from custom attribute.
Find details
Find details
Templates now can be read from custom location
Steps now can excluded statically or dynamically based on context. See more
Key components
The key components and how they relate to each other.
On a high level, Forms delivers well defined "apps" with the soul purpose simplifying a process related to an "IAM-problem". Each app is called a Flow.
A Flow have a set of basic properties. For example who may access, is it public, how do it consume authentication.
Flow consists of a number of Steps. Each Step aims to guide the end user through the process.
A simple Step could just consists of read only data about a user or a group.
Every Step includes a number of Controls. A Control is some kind graphical entity used to let users read or write data. Just like a Flow or a Step a Control has a number of properties that will define it's behaviour.
By combining Flow, Step & Control
Control
The smallest building block in a flow. Typically a Control is represented by some kind of visual component together with data from some data source.
Two categories of controls are available:
Basic
Advanced.
Basic controls are comparable to simple HTML inputs, such as checkboxes.
Advanced controls are more like mini-applications with specific goals. For example, they could display a list of Entra-ID users or groups as the first step in a Flow.
Checkbox
A checkbox component, that lets the user selects true or false (and the corresponding values).
DatePicker
Select a date from a calendar pop-up.
RadioButton
A radio button component, that lets the user select a given value from a list.
Input
An input field control, similar to an HTML input.
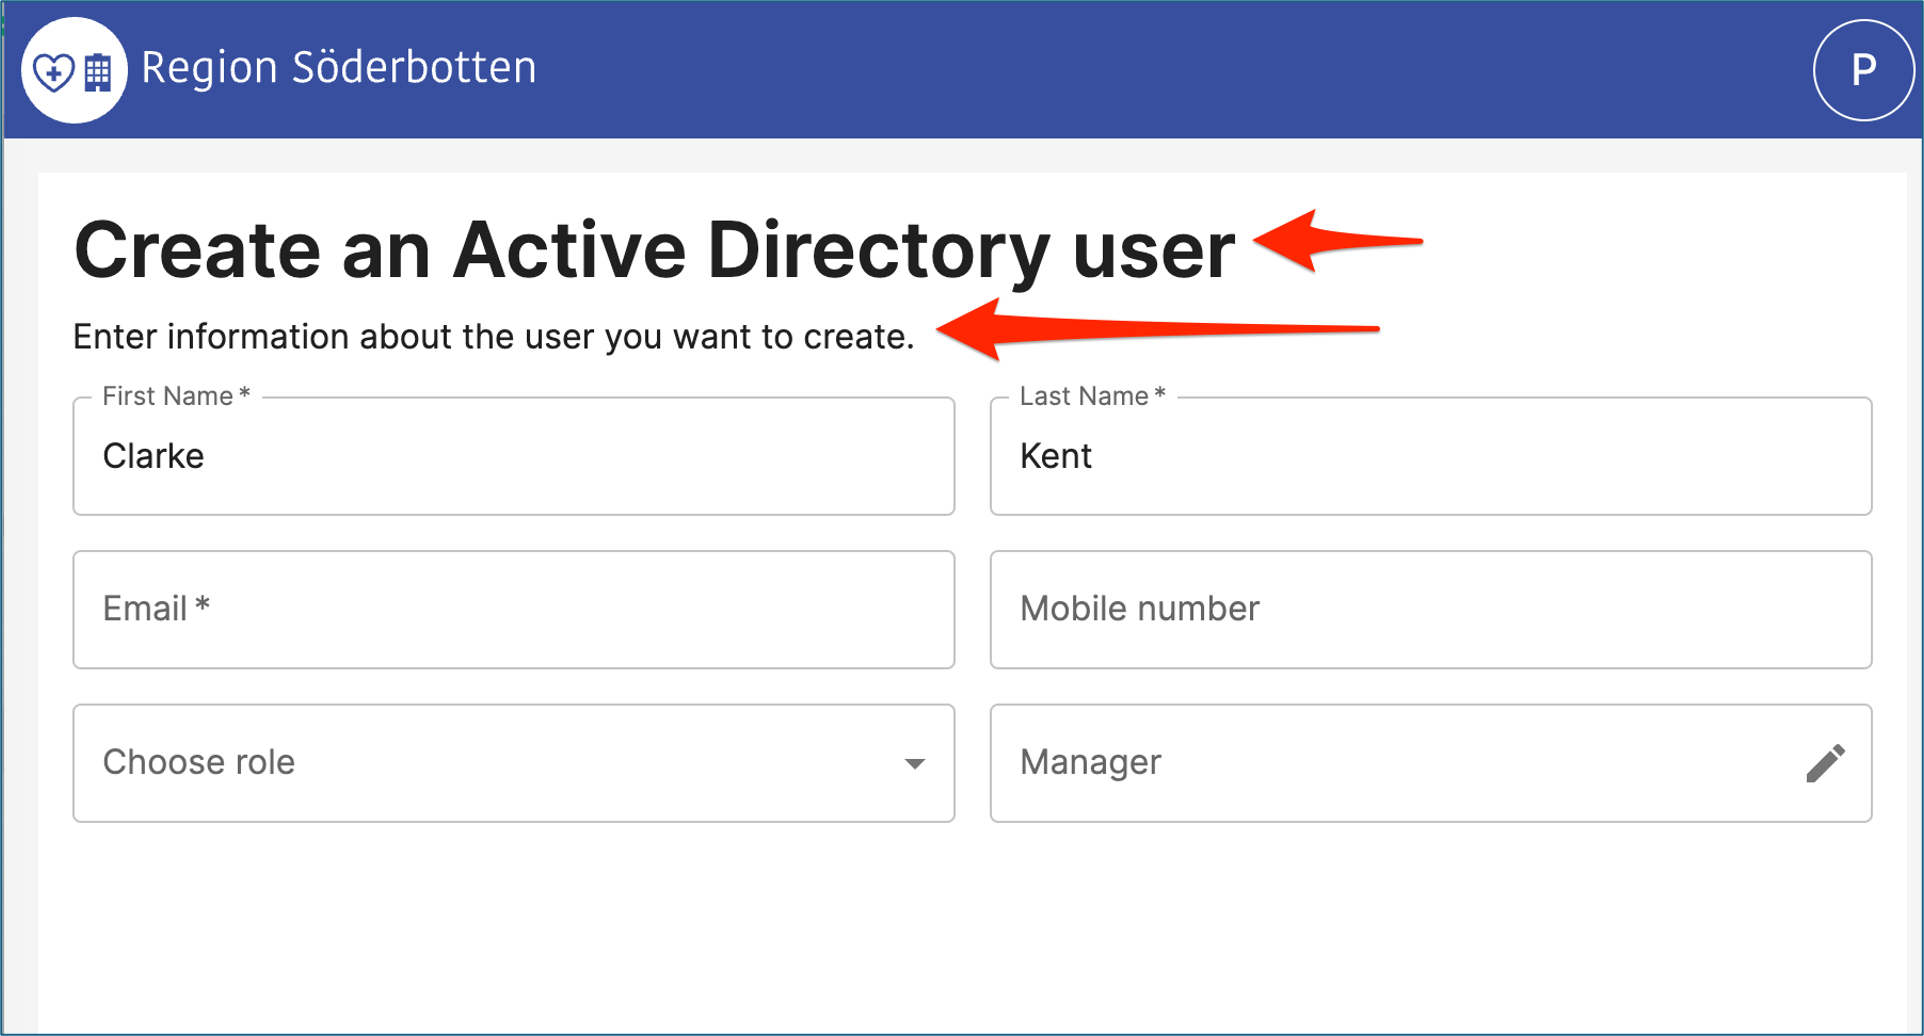
Below is a screenshot of the control. This is from a create step where an admin has added Clarke and Kent in two input controls. Email and Mobile number has no value yet.
Scenarions when the control can be used:
Like above when an admin creates a new object and needs to add data about the object. You can add data controllers to an inout control to verify correct syntax, an @ for email adress, no characters for an mobile number.
You like to display data about an object. You search an LDAP directory and display a user with data about the user. The input control can be in edit or read-only mode.
ValuePicker
A value picker component, that lets the user select a given value from a list.
The ValuePicker is often used as a drop-down list for admins to select predefined values from.
See example below.
Filtering access to a Flow
To skip the summary step and automatically redirect to other url.
Advanced controls are more like mini-applications with specific goals. For example, they could display a list of Entra-ID users or groups as the first step in a Flow.
TextArea control update for improved markdown handling
Details now supports markdown
2 new roles added, auditor & requestor.
A form can be preloaded with data sent via HTTP POST from an external application. Once the flow is completed, the user is redirected back to the calling application.
Summary now supports advanced controls
Search result may now be merged with existing item making configuration simpler.
Now supports expansion on search base
Now supports other ldap client than default
It is now possible forcing a control sending data to pipe even if not changed by user.
Done by setting:
Updating underlying building blocks, both front and backend, in order to keep CVE risks at a minimum.
This release
Crash when selecting search and then go back in ActiveDirectorySingleSelect
Random sort order in frontend component, selectorwidget, when showing list.
UI improvements, selectorwidget
Control ActiveDirectoryRemoveGroupFromMembers update
id: Unique identifier to the current flow. In subsequent pipe calls the id is sent to the pipe along with value(s) from the control and accessed in the piped using {{request.<id>}}
config: Block of control-specific configuration. Se each control for appropriate values.
small well-defined IAM apps can be built fast with instant added value.
When a user wants to do something in the UI, such as retrieve or write data to a data source or process data, a pipe can be used. A pipe consists of a number of valves that can retrieve, write or process data. Pipes and valves are something that is found in all Fortified ID products and are shared between the products, so if you have knowledge of this from one of our other products, it works the same in Forms.
A flow starts by initialising two state objects: the Accumulated Flow State, and the Accumulated Flow Delta. If an initialising pipe is configured, that pipe is executed and the result, which must be a single, flat key/value object, is added to the Accumulated Flow State.
During the progression of a Flow, data from each step is accumulated in both state objects according to certain rules.
The data in the Accumulated Flow State can be referenced using the prefix flow, combined with the ID of the Control that provided the data.
Example:
The data in the Accumulated Flow Delta is sent to the pipes configured to run throughout the flow.
Example:
The next section describes this process in detail.
As the flow transitions from one step to the next, a number of things happen:
Each Control in the current step contributes its data to the Accumulated Flow State. For read only Controls, no change is accepted.
Each Control in the current step is inspected to see if it has data to contribute to the Accumulated Flow Delta. A Control only contributes data to the Delta if at least one of the following conditions holds true:
The data that the Control holds has changed since the Step was loaded.
The Control property always_include is set to true.
If a pipe function is associated with the current step, that pipe is called with the Accumulated Flow Delta, i.e. accumulated changed data from all steps up to and including the current one.
The data in the response from the pipe function, which must be a single, flat key/value object, is added to the Accumulated Flow State.
Each Control contributes data to the Accumulated Delta according to a set of rules. The flowchart below visualises these rules. At the end of each step, before transitioning to the next or ending the flow, each Control is checked according to the flowchart, and when all Controls have been processed, the associated pipe is executed with the Accumulated Delta as parameter. The pipe returns a single, flat key/value object, which is added to the Accumulated Flow State.
Overview of Flow, Step, Control and Pipes
Flow
Step
Control
Pipes
Data management
Control data and accumulated state
Data flow
Input and Output (JWT)
Forms serve as an intermediary, accepting input from a requesting application, guiding the user through a structured sequence of steps, and finally returning control to the originating application.
Receive input
Forms receives a JWT containing data using post. The JWT is verified using the trust_store and the payload is put into the flow state. This can later be accessed using flow.my_param1 in forms, and using request.my_param1 in pipes.
Name
Description
Mandatory
Default
trust_store
This configuration is a part of the flow configuration.
Forms sends a JWT to an external service using post. The payload is defined in the payload json structure and is expanded.
Name
Description
Mandatory
Default
Note!
If Forms is used together with the ExternalFlow authenticator, the incoming external_flow_id must be added to the payload of the output JWT.
Markdown
Markdown is a lightweight markup language that you can use to add formatting elements to a step.
Add one or several labels and/or descriptions text elements to a step.
Example below shows a markdowns example, one label and one description.
The example can be added as one markdown or two separate markdowns.
Configuration when one markdown
{
   "id": "top_text_label_description",
   "type": "Markdown",
   "data": "# Create an Active Directory user  \nEnter information about the user you want to create."
}
Configuration when one markdown
Note. When using several markdowns in one step, make sure the id is unique.
{
   "id": "top_text_label",
   "type": "Markdown",
   "data": "# Create an Active Directory user"
},
{
   "id": "top_text_description",
   "type": "Markdown",
   "data": "Enter information about the user you want to create."
}
Markdown is a lightweight markup language that you can use to add formatting elements to a step.
Configuration
Name
Description
Default
Mandatory
type
Control implementation, must be Markdown
N/A
Click following link for a number of examples on how to use markdown in a step.
Properties
A radio button component, that lets the user select a given value from a list.
Name
Description
Default
Mandatory
ActiveDirectoryGroupEditGroupMember
Manage group members for a selected Active Directory group.
Use this control to manage group members for a selected groups.
Note. To select the group, which often is done in a previous step, use the control Selector.
ActiveDirectoryUserEditGroupMember
Update group membership for a selected user.
Use this control to manage groups for a selected user.
Note. To select the user, which often is done in a previous step, use the control Selector.
Attestor
A view of all orders that the logged-in user has been asked to attest. The view also enables them to accept or reject pending orders.
The logged-in user is identified by some user ID, most likely the SAML NameID attribute from SP login. This ID is used for filtering on order attestors.
Originator
A view of all orders that the logged-in user has created.
The logged-in user is identified by some user ID, most likely the SAML NameID attribute from SP login. This ID is used for filtering on order originator.
Properties
A view of all orders that the logged-in user has created.
Name
Desciption
Default value
Mandatory
Auditor
This view permits access to all orders unfiltered. regardless of logged-in user ID and permissions.
Properties
This view permits access to all orders unfiltered. regardless of logged-in user ID and permissions.
Name
Desciption
Default value
Mandatory
ActiveDirectorySingleSelect
Use to select one option from a list that is populated from the result of an LDAP query.
Below is a screenshot of the control. This is from a create step where an admin like to choose a manager for a user to be created.
EntraGroupSelect
Find an Entra ID group based on search data
Use this control to find and selected a Microsoft Entra ID group.
Note. When group is selected you might like to mange members for the group. Use the control EntraGroupEditGroupMember.
An Entra ID module deployed with matching name as defined in "namespace".
EntraUserEditGroupMember
Edit Entra ID user, update group membership.
Use this control to manage groups for a selected user.
Note. To select the user, which often is done in a previous step, use the control EntraUserSelect.
An Entra ID module deployed with matching name as defined in "namespace".
An Entra ID identifier, "selected_entra_id", located in either session or flow. Data is taken from session first and flow second. selected_entra_id must reference a Entra ID user.
EntraUserSelect
Find an Entra ID user based on search data
Use this control to find and selected a Microsoft Entra ID user.
Note. When user is selected you might like to manage groups for the user. Use the control EntraUserEditUserMember.
An Entra ID module deployed with matching name as defined in "namespace".
Selector
Use to find objects in data store, e.g. Active Directory. It performs searches using pipes and stores a selected value for next steps to consume.
TextArea
Use to display text from a text file. Markdown is supported as well as templating: {{flow.xxxx}} etc. Currently translation is not supported
Example markdown:
Installation
This section how to do a new installation or an upgrade of a Fortified ID product.
Supported target plattforms are:
Container (docker, kubernetes etc.)
Linux 64-bit
Linux
To install on Linux, click the following link:
When installation is completed, verify the following:
Start the service by running <installation_path>/FortifiedID/forms/customer/bin/start.sh
Verify by accessing http://localhost:8080/forms/demo1 or http://localhost:8080/forms/demo2
Windows
To install on Windows, click the following link:
When installation is completed, verify the following:
In Windows Services, verify that Fortified ID <product name> service exists
In file system, verify that drive:\..\FortifiedID\<product name> exits
ATTESTATION
Any form can be configured for attestation. In essence, the collected form data is sent to the attestation engine, where one or more designated approvers can review, approve, or reject the request.
Certain operations or flows may be considered sensitive or require additional oversight before execution. This is where attestation becomes valuable.
Attestation enables manual review by one or more designated approvers before any automated actions are carried out. It is implemented as a configurable flow using built-in functionality.
Approvers are notified via email and receive a PDF document containing the relevant data for verification. Each PDF is tailored to the specific flow, ensuring that the information is clear, accessible, and easy to review.
Once a flow has been successfully attested, the PDF can be forwarded to an external archiving system for secure, long-term storage—ensuring traceability, auditability, and compliance.
Overview
Stop the service by running <installation_path>/FortifiedID/forms/customer/bin/stop.sh
{"id":"top_text_label_and_description","type":"Markdown","data":"# Create an Active Directory user \nEnter information about the user you want to create."}
Forms
The Forms module is, apart from delivering it's functionality, also a HTTP modul which means it inherits much configuration from basic HTTP module.
Forms module handles loading of multiple Flow. Multiple instances of Forms module can be deployed.
Windows
64-bit
Access to media is provided by Fortified ID support. Credentials consist of a username and an access token which are used when downloading the artefacts.
After successful installation, verify access to http://<installation_host>:8080.
A simple welcome page should be displayed.
General information
jwt
payload
A json structure containgn payload data
location
The default location to post the data to.
This configuration is a part of the flow configuration.
Property value for when the checkbox is not checked
"false"
config.data
This initial value of the checkbox. Can be true/false of a string equal to the value_true.
false
config.readonly
Open to edit by enduser. true/false
false
config.required
Must have a value when leaving the step. true/false
false
config.always_include
Always include in pipe requests
true
{"id":"my_checkbox
type
Checkbox
N/A
{"id":"originator
type
Must be Originator.
N/A
Configuration
This control works in conjunction with WorkOrder module. It must be installed.
{"id":"auditor
type
Must be Auditor.
N/A
Configuration
This control works in conjunction with WorkOrder module. It must be installed.
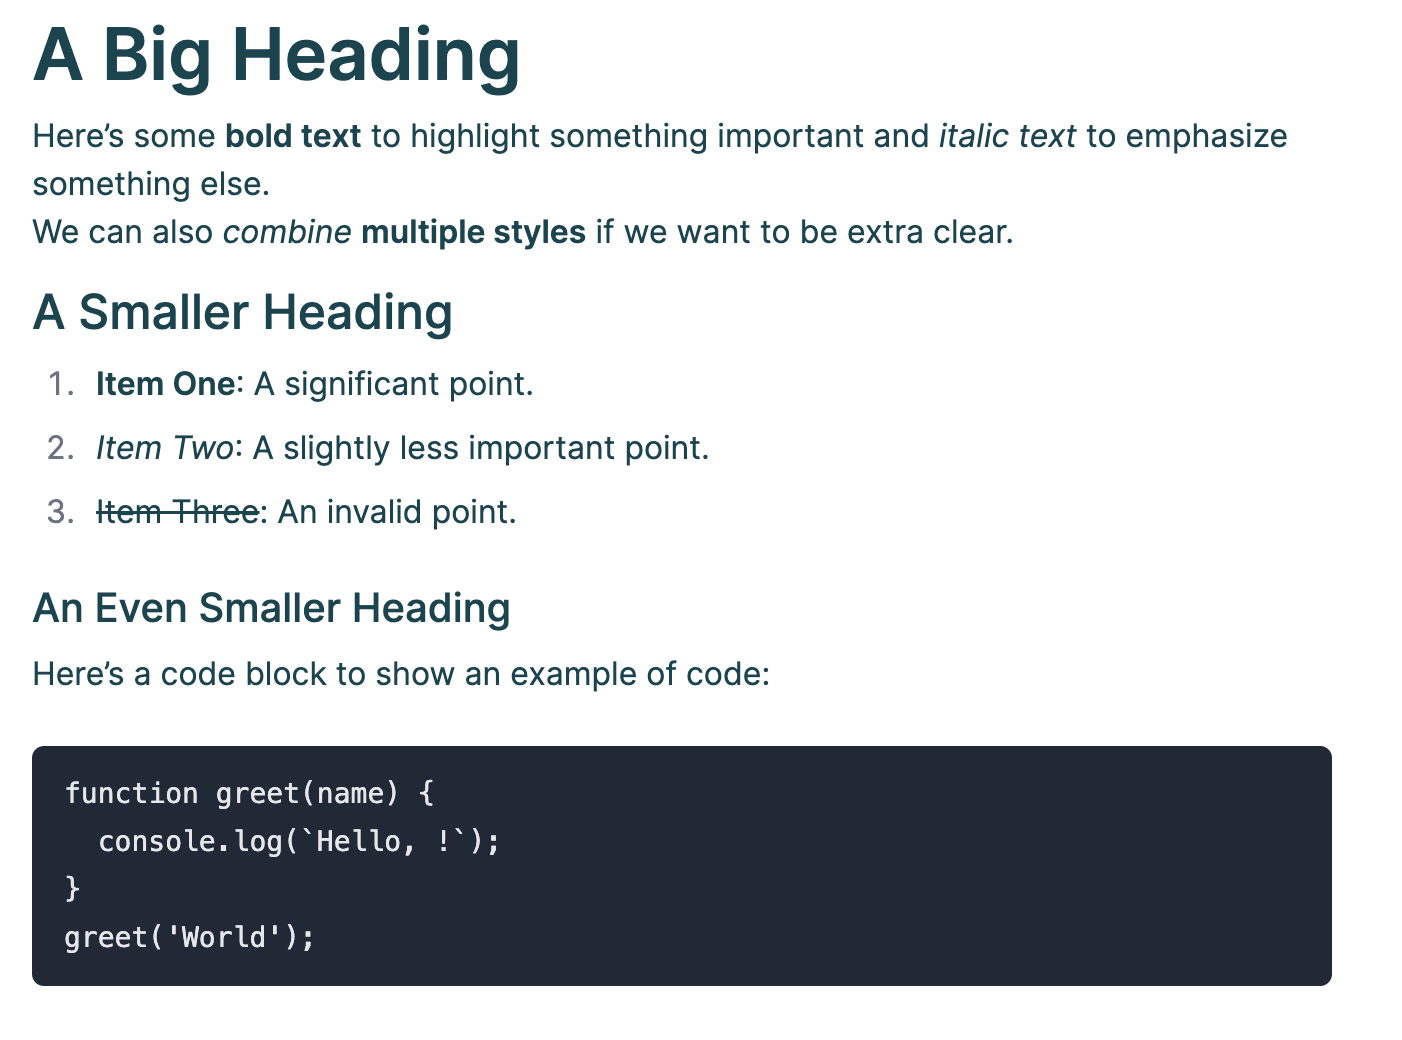
# A Big Heading

Here’s some **bold text** to highlight something important and *italic text* to emphasize something else.
We can also *combine* **multiple styles** if we want to be extra clear.

## A Smaller Heading

1. **Item One**: A significant point.
2. *Item Two*: A slightly less important point.
3. ~~Item Three~~: An invalid point.

### An Even Smaller Heading

Here’s a code block to show an example of code:

```javascript
function greet(name) {
  console.log(`Hello, ${name}!`);
}
greet('World');
User mapping
User mapping
Requirements
Requirements
Requirements
Properties
Select a date from a calendar pop-up.
The available dates can be limited with min_date and max_date.
The input fields min_date, max_date and data represents dates. Use input_formats to specify date format handlers. Two special format handlers are available:
duration: Handles ISO 8601 durations e.g. P10D, -P5Y. Evaluates to todays date plus the duration.
windows_filetime: Windows FILETIME format
Name
Description
Default
Mandatory
Properties
A value picker component, that lets the user select a given value from a list.
Name
Description
Default
Mandatory
type
Control implementation
N/A
Properties
A view of all orders that the logged-in user has been asked to attest. The view also enables them to accept or reject pending orders.
Configuration
Name
Desciption
Default value
Mandatory
type
Must be Attestor.
Properties
Edit Entra ID user, update group membership.
Name
Desciption
Default value
Mandatory
type
Must be EntraUserEditGroupMember.
Object array, "entra_pending_remove" - contains data on what groups to remove from user.
Object array, "entra_pending_add" - contains data on what groups add to user.
Array data will ha the syntax:
[{"id":"1234567","displayName":"Group 1"}]
Properties
Use to display text from a text file. Markdown is supported as well as templating: {{flow.xxxx}} etc. Currently translation is not supported
JDBC client, version 2025.29 - details are found here
Ldap client, version 2025.29 - details are found here
CEF module, version 2025.29 - details is found here
Node module, version 2025.29 - details is found here
SMTP module, version 2025.29 - details are found here
Entra ID module, version 2025.5 - details are found here
Workflow module, version 2025.3- details are found here
Only Node is started by default. Modules have to be added in the configuration in order to be started.
EntraGroupEditGroupMember
Edit Entra ID group, update group members
Use this control to manage users for a selected group.
Note. To select the user, which often is done in a previous step, use the control EntraGroupSelect.
Requirements
An Entra ID module deployed with matching name as defined in "namespace".
An Entra ID identifier, "selected_entra_id", located in either session or flow. Data is taken from session first and flow second. selected_entra_id must reference a Entra ID group.
Flow
See a Flow as an app. It defines things like number of steps, path of access and if it is public or protected by authentication. A Flows aims to guide end-users performing a well defined IAM task.
The Flow is defined by a JSON file. Name of the file can be anything, but flow.json is a recommended name. Format of the data inside must be either JSON or JSONC. The flow.json file will be picked up, loaded and exposed by the Forms module.
Name
Description
Default
Mandatory
Properties
Properties for Input control
Name
Description
Default
Mandatory
Properties
A radio button component, that lets the user select a given value from a list.
Name
Description
Default
Mandatory
Properties
Edit Entra ID group, update group members
Name
Desciption
Default value
Mandatory
Properties
Find an Entra ID group based on search data
Name
Desciption
Default value
Mandatory
Properties
Find an Entra ID user based on search data
Name
Desciption
Default value
Mandatory
Properties
Use to find objects in data store, e.g. Active Directory. It performs searches using pipes and stores a selected value for next steps to consume.
Name
Desciption
Default value
Mandatory
Setup
This will describe how to configure a flow using attestation
WorkOrder module deployed.
Create a flow used for attestation (accept/reject) using Attestor control.
Configure last PIPE sending data to work order database and possible notifying user.
Configure one accept pipe to be executed once the work order is attested
Configure one reject pipe to be executed if order is rejected
Instead of performing updates directly, data used must be send to work-order database. Two thing are required for this:
Overview
Please refer to the common configuration of for information on how to change the look and feel of Forms.
A PDF file used to visualise what is about to happen if accepted. Either use Html2Pdf valve for dynamic creation or use a static PDF file.
In the last PIPE in the flow use
Once all attesters accepted the work order, accept pipe will be executed. Any flow data from order creation is present along with additional static data.
Accessing data sent from "work flow accept" is done using pattern {{request.xxx}}
Note that the accept pipe is executed in system context. No session with user data will be present.
It only takes one attester to reject for the order to be rejected. Once rejected the reject pipe is executed. Here you can configure notification if desired.
Prerequisites
Flow description
Sending data to work order
Accepting a work order
Rejecting a work order
id
Unique ID within the flow
N/A
config.required
Must have a value when leaving the step. true/false
Must have a value when leaving the step. true/false
false
config.readonly
Can be modified. true/false
false
config.time_zone
Calendar time zone
Server default
config.input_formats
Parse initial value using these formats. String array.
["yyMMdd", "yyyyMMdd", "yyyy-MM-dd"]
config.output_format
Format output
yyyy-MM-dd
config.min_date
Min date. Expandable string. Date or duration.
config.max_date
Max date. Expandable string. Date or duration.
data
Pre-selected date. Expandable string. Date or duration.
{"id":"account_expiration
type
Must be "DatePicker"
N/A
id
Unique ID within the flow
Last part of the URL how to access the flow. Must be unique within the forms module.
N/A
If flow can be accessed without any authentication (true/false).
false
Array of named roles user must have in order to access the flow, "one of"
Empty array: []
Should progress bar be visible (true/false).
true
Should user menu be visible (true/false).
true
Additional logging options.
Note. This can be added to forms module and will then be available in all flows.
Empty array []
Steps to include for the flow. Recommendation is using @include directive for better overview.
Empty array []
Pipe executed before first step.
N/A
Pipe to execute when last step is complete.
N/A
Step used after last regular step is executed with success. Used for user notification etc. Do not put any logic here.
N/A
Step used after last regular step is executed with with failure. Used for user notification etc. Do not put any logic here.
N/A
Should next button be enabled (true/false).
true
Text on "Next" button
Next
Should save button be enabled (true/false).
true
Text on "Save" button
Save
Should restart button be enabled (true/false).
true
Text on "Restart" button
Restart
{"name":"
Sometimes it is necessary to perform some kind of logic before first step is rendered. Typically used for validation and or collecting data reqired in step 1.
For case like this use pre_pipe.
In order to consume data in subsequent steps, make sure the pipe returns one item. Data in this item will be accessible using {{flow.xxx}}
Setting up a flow
Before step 1
id
Unique ID within the flow
N/A
config.required
Must have a value when leaving the step. true/false
false
config.readonly
Open to edit by enduser. true/false
false
config.always_include
Should data be sent to pipe regardless if it is changed or not
false
config.format
Frontend format validation. See more below
N/A
config.pattern
Custom format pattern. Use for custom pattern. Otherwise leave.
N/A
{"id":"
By setting config.format, it guides the user entering value following a defined ruleset. A predefined set is available:
Typically the id of current user. ID will not be visible. Configured value is taken from session or flow. First session, flow second.
N/A ("")
{"id":"
Object array, "entra_pending_remove" - contains data on what groups to remove from user.
Object array, "entra_pending_add" - contains data on what groups add to user.
Array data will ha the syntax:
[{"id":"1234567","displayName":"Group 1"}]
type
Must be EntraGroupEditGroupMember.
N/A
This control works in conjunction with Entra ID module. It must be installed.
Exposed data to flow
namespace
Identifier of EntraID module to use
default
columns
List array with columns to display
["displayName","description"]
search_attributes
List array with columns used for searching. Search is done using "starts with".
["displayName","mail"]
ui.ui:search
Should search input be visible for end user, true/false
true
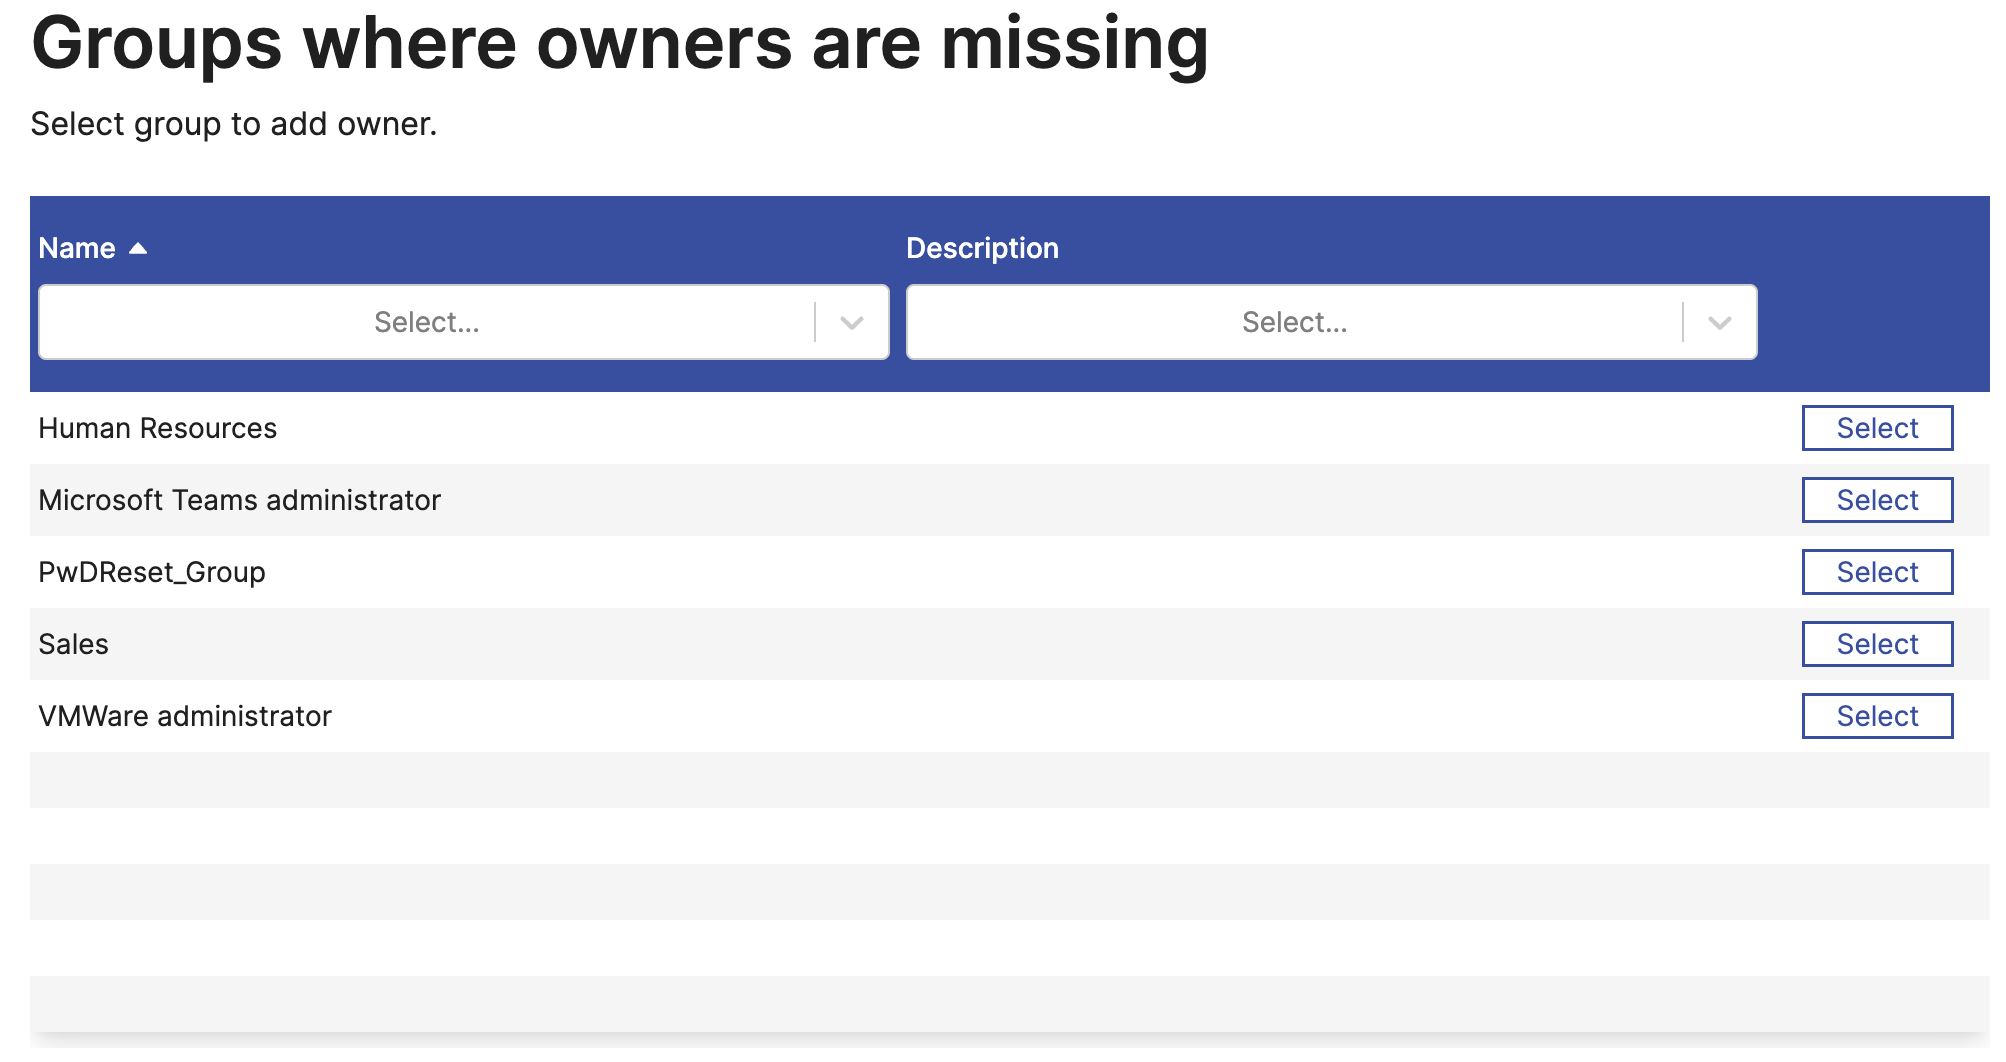
owned_groups_only_attribute
If set, groups will filtered based on the attribute.
N/A
{"id":"
Set owned_groups_only_attribute will cause control match the data from owned_groups_only_attribute. Matching is done using data from owned_groups_only_attribute and entra_identifier.
entra_identifier is read from session or flow. Session read first then flow.
Settings "owned_groups_only_attribute":"owners", will match value from entra_identifier with id in "owners". Only showing groups where user is set to owner.
"selected_entra_id" - id of selected group
"selected_entra_displayName" - display name of selected group.
type
Must be EntraGroupSelect.
N/A
This control works in conjunction with EntraID module. It must be installed.
List array with columns used for searching. Search is done using "starts with".
["displayName","mail"]
ui.ui:search
Should search input be visible for end user, true/false
true
owned_users_only_attribute
If set, users will be filtered based on the attribute.
N/A
{"id":"
Set owned_users_only_attribute will cause control match the data from owned_users_only_attribute. Matching is done using data from owned_users_only_attribute and entra_identifier.
entra_identifier is read from session or flow. Session read first then flow.
Settings "owned_users_only_attribute":"manager", will match value from entra_identifier with id in "manager". Only showing users where user is set to owner.
"selected_entra_id" - id of selected group
"selected_entra_displayName" - display name of selected group.
type
Must be EntraGroupSelect.
N/A
This control works in conjunction with EntraID module. It must be installed.
Only showing used by end user
Exposed data to flow
pipe_id
Id of pipe searching for objects
Same as control id
columns
What columns to be displayed in UI.
N/A
submit_on_change
Should selection of an item move to next step. true/false
true
search
Should user be able to enter custom search data.
false
ui
Extra ui configuration, see below
{"id":"contactSelector
To populate list of items in UI a pipe must be executed. List of items returned should at least contain properties defined in columns.
Data sent to pipe is:
search - containing user input if config -> search is set to true
columns - comma separated string of defined columns
Return data must be in a form of a list of items.
When pressing Select, data exposed to flow is found using key if control id. Value is item id returned from pipe
For row ordering according to columns use the following type of configuration. In this example the rows will be sorted first by email, then name, phone and lastly date_of_birth.
You can also see the configuration example in the example above in the properties table examples.
Use to select one option from a list that is populated from the result of an LDAP query.
Configuration
Name
Desciption
Default value
Mandatory
type
Must be ActiveDirectorySelectOneValue
N/A
The search filter is a template that has access to all data that is available in the flow. Additionally, the template can use the parameter search_query, that contains the user input.
The attributes defined by display_key and value_key are always queried.
Properties
This section includes the main parameters for the Forms module.
Name
Description
Default value
Mandatory
name
Must be Forms
N/A
Properties
Manage group members for a selected Active Directory group.
An LdapClient module deployed with matching name as defined in "namespace".
Name
Desciption
Default value
Mandatory
Properties
Update group membership for a selected user.
An LdapClient module deployed with matching name as defined in "namespace".
This control works in conjunction with LdapClient module. It must be installed.
Exposed data to flow
Valves used in finalize pipe
namespace
Identifier of LdapClient module to use
default
columns
List array with columns to display
["cn","description"]
change_is_required
Force admin to update user, true/false
false
base_dn
Search base DN.
"DC=company,DC=local"
scope
Search scope.
"SUB"
current_filter
Search filter. Used to fetch all groups the the user is a member of.
N/A
available_filter
Search filter. Used to fetch available groups.
N/A
{"id":"adUserGroupMember
Object array, "ad_pending_remove" - contains data on what groups to remove from user.
Object array, "ad_pending_add" - contains data on what groups to add to user.
Array data will have the syntax:
Valves used in finalize pipe
ActiveDirectoryAddMemberToGroups
Used to add a single group member to groups
ActiveDirectoryRemoveMemberFromGroups
Used to remove a single group member from groups
type
Must be ActiveDirectoryUserEditGroupMember
Requirements
Configuration
N/A
"ad_pending_add": [
{
"id": "CN=AWS administrator,OU=access_review,OU=Governance,OU=IdM_demo,OU=Product_Testing,DC=company,DC=local",
"description": "Test",
"cn": "AWS administrator",
"sAMAccountName": "AWS administrator"
},
  {
"id": "CN=Cert Publishers,CN=Users,DC=company,DC=local",
"description": "Members of this group are permitted to publish certificates to the directory",
"cn": "Cert Publishers",
"sAMAccountName": "Cert Publishers"
}
],
"ad_pending_remove": [
  {
"id": "CN=Access Control Assistance Operators,CN=Builtin,DC=company,DC=local",
"cn": "Access Control Assistance Operators",
"sAMAccountName": "Access Control Assistance Operators",
"description": "Members of this group can remotely query authorization attributes and permissions for resources on this computer."
}
]
This control works in conjunction with LdapClient module. It must be installed.
Exposed data to flow
Step
Steps are comparable to pages in a form, where each step includes sections that focus on a specific area. By linking steps, one can create highly customizable IAM solutions.
Creating a step
A step is represented by a json object. Steps can be loaded from one json file or multiple files. Recommended setup is to keep each step in a single file. This will simplify configuration and overview.
Name
Description
Default
Mandatory
Example step to create a user.
Example step to edit and find users.
Example with all main properties.
If configured, execution of a pipe is done with all data available to the step. This means data will vary depending on what step is executed.
Data from all previous executed steps will be sent to pipe and accessed in pipes using {{request. pattern.
In order to be able to access any data returned from a pipe, return a single item in a pipe.
Data will available using {{flow.xxx}} pattern.
A step can be enabled/disabled using the "enabled" flag. Both the page user interface and the pipe-execution is disabled if this flag is false.
You can also enable/disable a step conditionally using the "include_expr"-expression (an expression that returns true or false). If the expression is evaluated to true, the step is included, otherwise skipped.
The actual filter is an ECMA-script (JavaScript) that MUST evaluate to true, false or to a boolean function returning true or false.
Predicate expression controlling if step should be included or not.
"true"
Pipe execution
Returning from pipe execution
Skipping execution
Skipping execution conditionally
{"controls":[{"id":"top_text_label","type":"Markdown","data":"# Create an Active Directory user \nEnter information about the user you want to create."},{"id":"givenName","type":"Input","ui":{"ui:size":{"md":6}},"schema":{"format":"strict"},"config":{"type":"string","required":true}},{"id":"sn","type":"Input","ui":{"ui:size":{"md":6}},"schema":{"format":"strict"},"config":{"type":"string","required":true}},{"id":"mail","type":"Input","ui":{"ui:size":{"md":6}},"schema":{"format":"email"},"config":{"type":"string","required":true}},{"id":"mobile","type":"Input","ui":{"ui:size":{"md":6}},"schema":{"format":"phone"},"config":{"type":"string"}},{"id":"chooseRole","type":"ValuePicker","ui":{"ui:size":{"md":6}},"config":{"required":false,"options":[{"title":"Human Resources","value":"hr"},{"title":"Sale","value":"sale"},{"title":"IT","value":"it"},{"title":"Engineering","value":"engineering"}]}},{"id":"adUserFindManager","type":"ActiveDirectorySingleSelect","ui":{"ui:size":{"md":6}},"config":{"attributes":["cn"],"namespace":"${globals.ldap1_name}","base_dn":"${globals.ldap1_flows_search_user_dn}","scope":"SUB","pre_filter":"(distinguishedName={{flow.manager}})","filter":"(cn={{search_query}})","value_key":"distinguishedName","display_key":"cn"}}]}
order
time_lock
favicon
verbose_logs
controls
pipe
buttons.xxx
enabled
include_expr
{
"controls": [
  {
"id": "top_text_label",
"type": "Markdown",
"data": "# Change user\nSelect the user you want to modify"
},
  {
"id": "findActiveDirectoryUser",
"type": "Selector",
"config": {
"columns": ["displayName","sAMAccountName","url","manager"],
"pipe_id": "active_directory_edit_user_step01_widget"
}
}
],
"pipe": "active_directory_edit_user_step01"
}
// Not included
"include_expr": "false"

// Only included if session contains a username property
"include_expr": "session.username != null"

// Only included if a control from a previous step (findMyActiveDirectoryExtendAccountExpires) has a value
"include_expr": "str.isNotNullOrEmpty(flow.findMyActiveDirectoryExtendAccountExpires)",